Inside Looking Out
As much as we look forward to spring every year, we also dread it. We love the warmer weather and the longer days, but get driven inside by the rain and pollen that inevitably follow. For several weeks every spring, we are actually more or less house bound as the storms of pollen rage outside. We watch from the windows, all the while blowing our noses and wiping our eyes, as trees turn green and flowers bloom. This year, however, we having something else to watch from our window that makes the long days go by much more quickly. It started with these a couple of weeks ago.
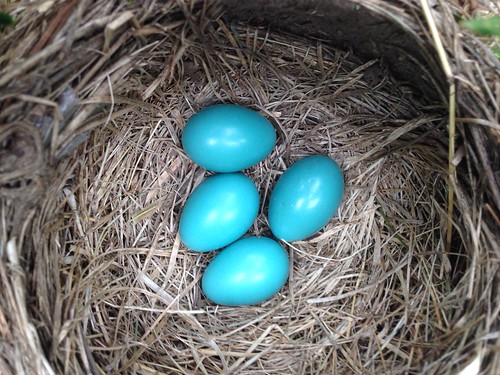
This lovely little nest is in a bush right outside our family room window. We have been watching the Mama and Papa robins take care of the eggs in turn. Twelve days ago, they began hatching.

After that, they have pretty much been growing like crazy. They want to eat all the time.
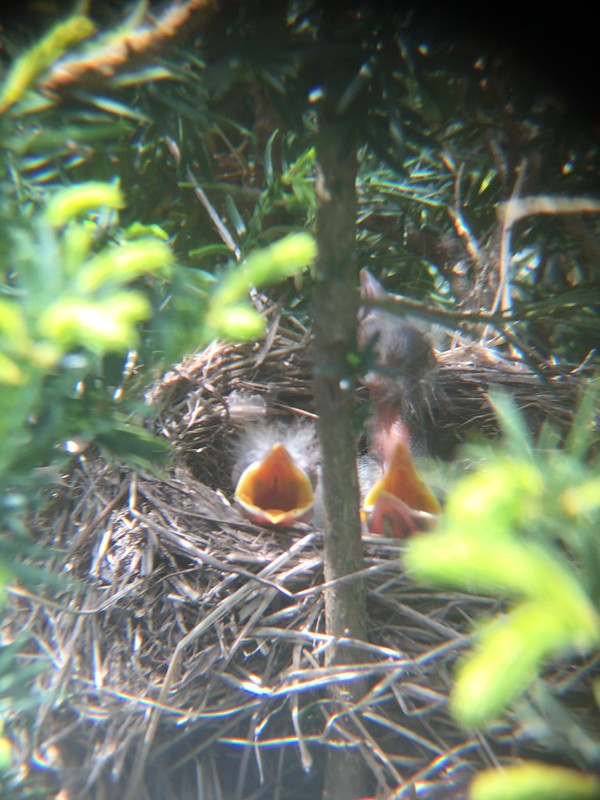
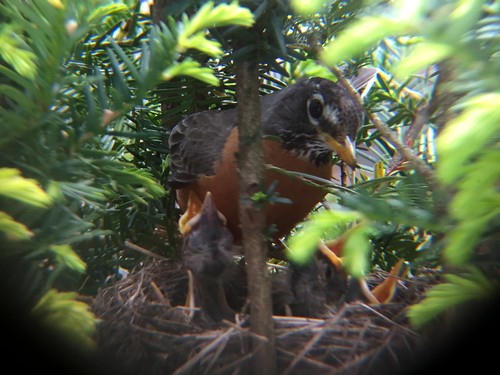
The parents are very busy feeding them and caring for them when it rains.
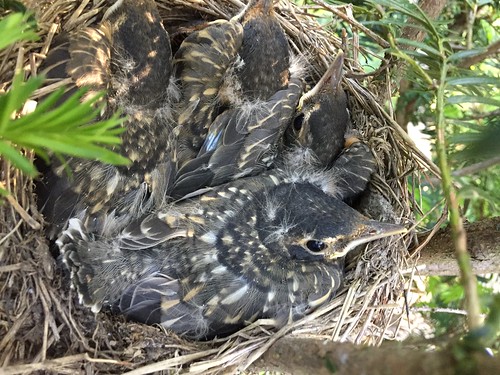
Now, there is hardly any space left in the nest and they have been stretching their wings a lot to get ready for the day when they will leave it.
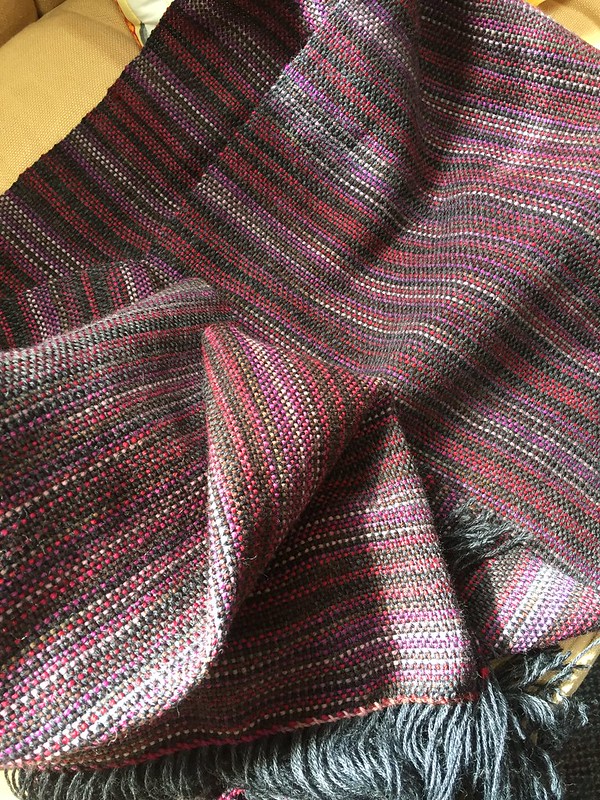
All this time indoors has also helped me finish some projects that have been lingering. My second, scarf/wrap/tablerunner/ Idon’tknowwhattodowithit weaving project is finished and awaiting its unknown fate.
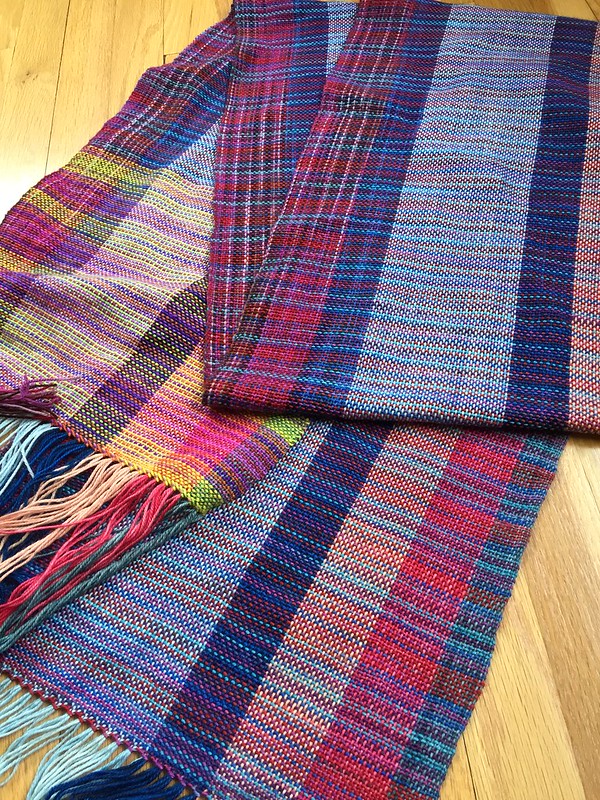
I was particularly happy with this project because I warped it with a lot of little balls of leftover sock yarn. It’s about 80 inches long and 18 inches wide. Next on the loom is something I hope will turn out to be hand towels.
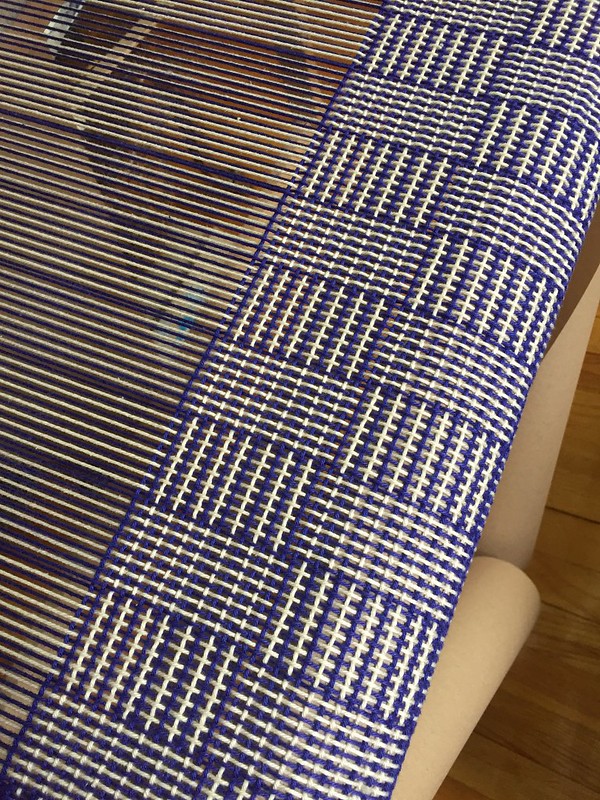
The weave is turning out a little looser than I expected, though, so I hope that it works out. I guess I won’t know until I take it off, which means I’ll have to finish it first. Weaving is a little different from knitting in that way. Knitting can always be unraveled and reknit. That wouldn’t work so well with weaving.
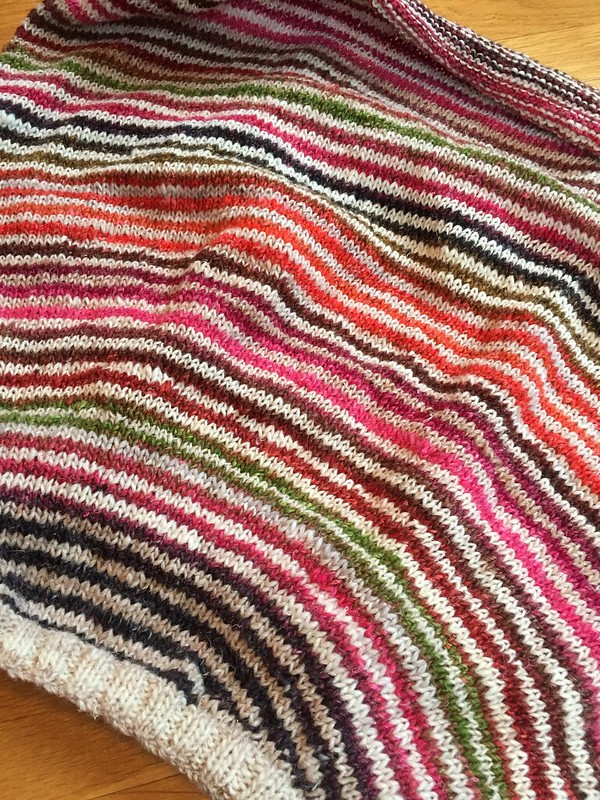
Speaking of knitting, I’m happy to have finished my Stripey Noro sweater.

This was a really fun knit that really kept my spirits up during some of those dark days of winter when everything was dreary except this sweater.

Now, it’s perfect for cool spring days.
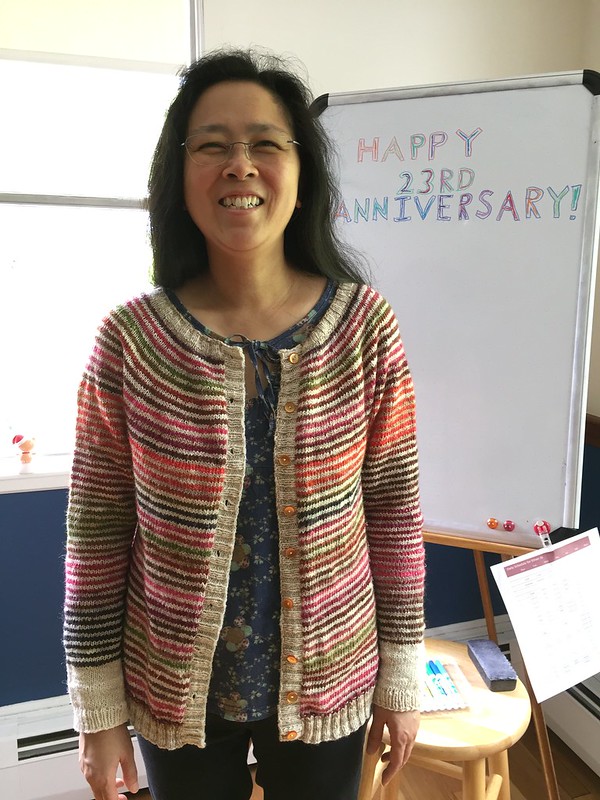
And yes, it’s also great for wearing to a fancy dinner out with the husband on your 23rd wedding anniversary. After all those years, he knows me really well and got me a most stupendous present.
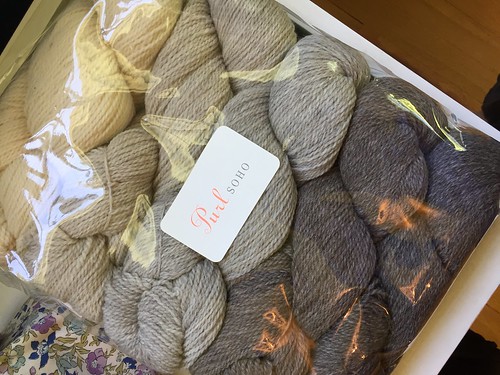
It’s 5 skeins of Purl Soho good wool, which they list as a dk weight yarn, but at 383 yards per 100g, it seems like it might be closer to a sport weight. In any case, I’m on the hunt for a good pattern for this bundle of squishiness. Perhaps a fair isle sweater of some sort? In the meantime, I will enjoy squishing it while I watch the robins grow.
Chocolate Peanut Butter Smooshies
2018 has been an interesting year for me, diet-wise. Without going into a lot of detail that might bore you, I’ll just say this: I did the Whole30 diet in January. It was hard, but was worth it for the things I learned about myself in the process. Who knew that a person could be allergic to sweet potatoes? I’ll be adding that to my strange tomato allergy. Actually, it’s not too surprising given that they are from the same nightshade family of plants. For now, I don’t seem to be having an allergy to regular potatoes, though the jury is still out on peppers.
The biggest revelation from my experience is that I am allergic to dairy; not just lactose intolerant as I always thought, but actually allergic. As in, if I have dairy in any form (even baked in bread or cakes), I start to sneeze and my nose gets stuffy and the next day I am a wreck. I can’t even explain how life changing this realization has been for me and also for my younger son, who turns out to have the same allergy. We eliminated dairy from his diet and the results have been amazing.
As a result, our eating habits are undergoing a total upheaval these days, which is probably why I haven’t been posting much about my baking lately. There has been some baking, but a lot of it has been some experimenting with sugar levels, replacing dairy, and it hasn’t all turned out well.
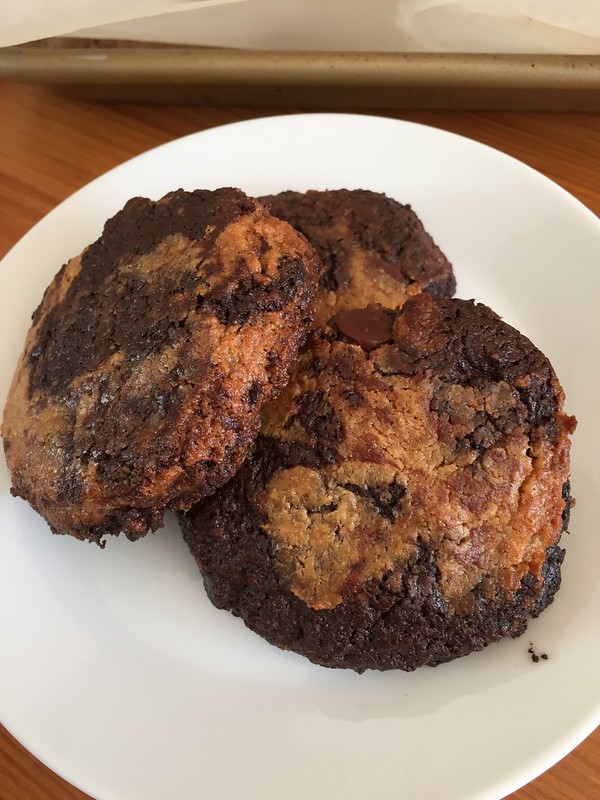
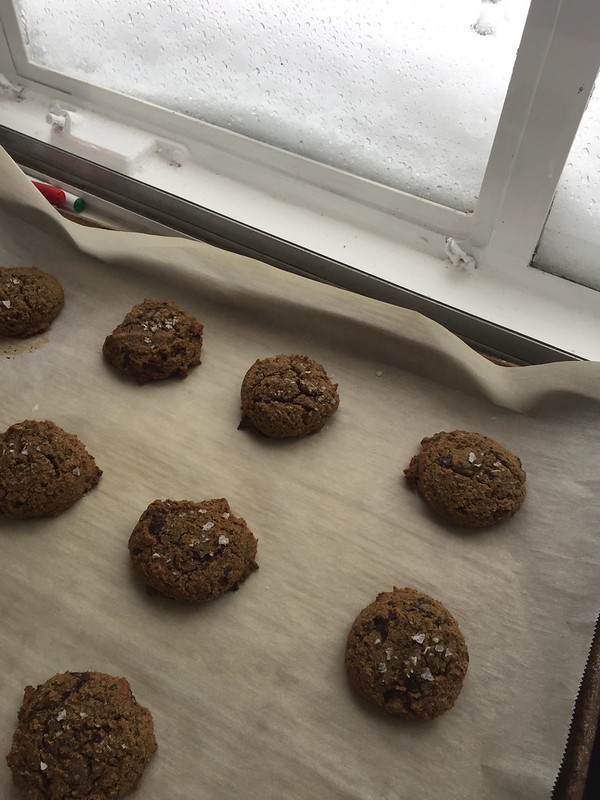
Today, though, I have a great, easy recipe for you that I have been working on for at least a couple of years. These Chocolate Peanut Butter Smooshies originally came about as an idea for our cookie fund-raiser that we used to do.

The cookies are a yummy combo of a peanut butter cookie dough and a chocolate cookie dough, just smooshed together to create an attractive two tone look. They are also really delicious and easy. In fact, you don’t even need a mixer to make these. Just a few spoons and bowls will do.
They are gluten free, dairy free, and soy free if you choose you chocolate carefully. However, that’s not all. The best part of these cookies is that they are pantry friendly. There are no unusual flours that you have to buy that you may never use again. I bet most of you have all the ingredients in your pantry to make these right now. Also the recipe is easily customizable to your allergy requirements. If you can’t eat peanuts, the cookie is just as good with almond butter. Or, if coconut oil is not your thing, margarine or regular butter will work as well. I have even made them with vegetable oil and, while they come out cakier and softer, they are still good.
I hope you will try them and let me know what you think! If you have any questions, ask in the comments and I will do my best to answer.
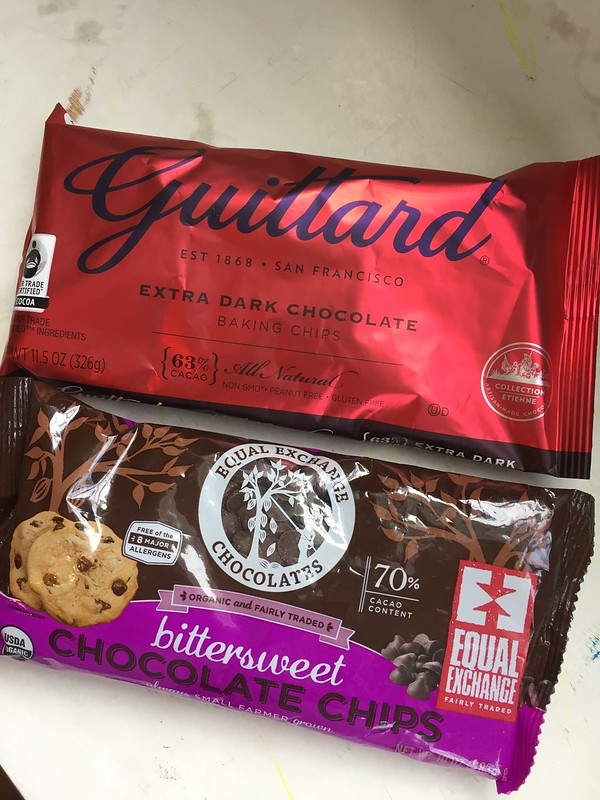
A note about chocolate: We tested the two brands of chocolate chips that I could find in the stores that were affordable and gluten, soy and dairy free. We all preferred the Guittard brand. Unless you are baking for people with specific allergies, there is no need to buy specific brands of chips. Also, regular chopped chocolate can be used here.
CHOCOLATE PEANUT BUTTER SMOOSHIES
makes about 15 cookies
Preheat your oven to 325 degrees. Line a cookie sheet with parchment paper.
For the peanut butter dough:
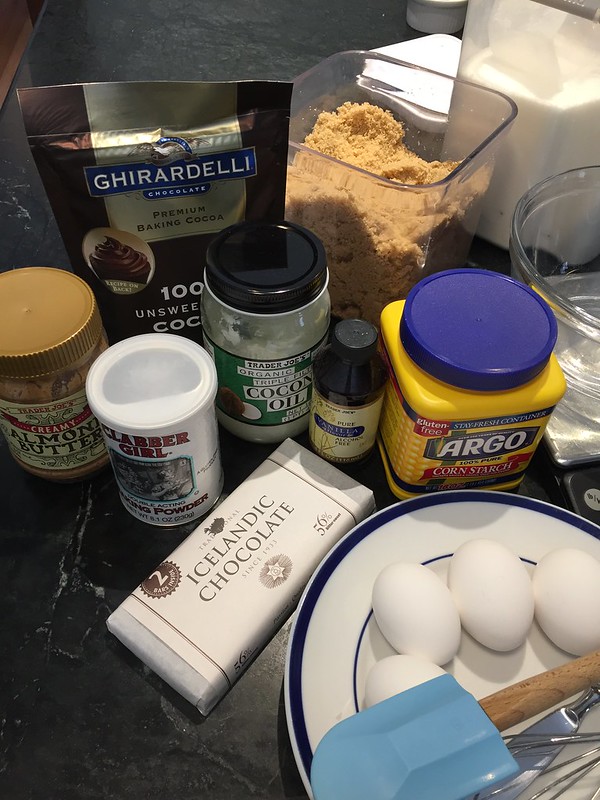
Mix the following ingredients together in a medium bowl with a spatula or spoon:
1/2 cup (4.5 ounces) peanut butter, creamy or chunky, sweetened or not
1/3 cup (2.5 ounces) light brown sugar
1 large egg
1/2 cup (3 ounces) chocolate chips or chopped chocolate
Set aside
For the chocolate dough:
In a small microwaveable bowl, melt together in the microwave, using 15- 20 second intervals and stirring in between:
2/3 cup (4 ounces) chocolate chips or chunks, any kind
3 Tablespoons (1 and 1/2 ounces) coconut oil, butter, or margarine
Stir until smooth and set aside to cool a little.
Next, stir together in a large bowl until smooth:
1/3 cup (2.5 ounces) light brown sugar
1 large egg
1/2 teaspoon vanilla extract
1/4 teaspoon salt
1/4 teaspoon baking soda
1/4 teaspoon baking powder
1/4 cup (3/4 ounce) cocoa powder, dutch or natural
2 Tablespoons (3/4 ounce) cornstarch
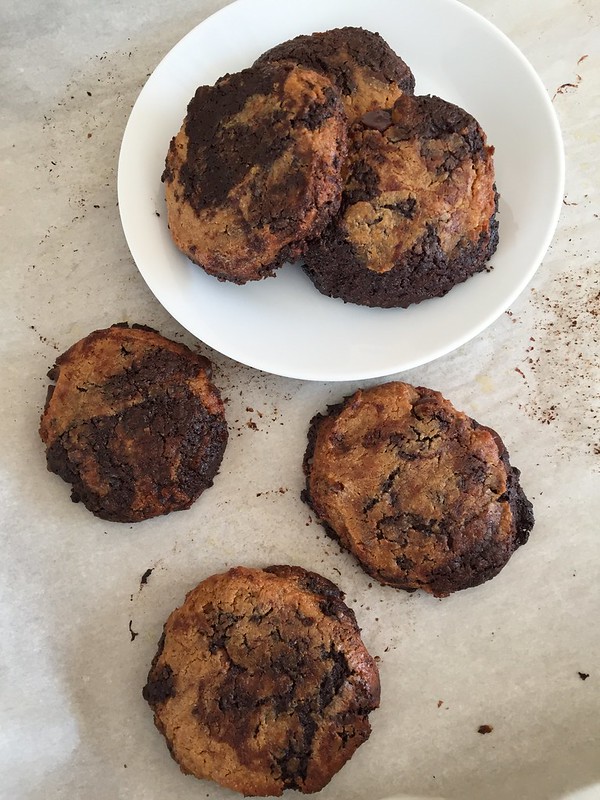
Add the melted chocolate mixture and stir again until smooth. Move all the dough to one side of the bowl. Add the peanut butter dough to the empty side and using your spoon, fold together a few times. I counted 4 folds. You don’t want to overmix or you won’t get the pretty smooshy affect. Shape the dough into golf ball sized balls, being careful to get a good mix of the two doughs in each ball, each using about 2 level tablespoons of dough. Space them 2 inches apart on your baking sheet and flatten them to a half inch thickness with your palm. Bake for 12-15 minutes or until set and the peanut butter dough is just starting to brown a little. Cool on the pan. Enjoy with a glass of your favorite dairy or non dairy milk!
You can also freeze the unbaked cookie dough pucks and bake them on demand later. Since the dough will be frozen, you may have to bake them for an extra couple of minutes, depending on your oven.
Spring Sewing
Last night, I heard from our backyard the first spring peeper peeping. He sounded a little slow and lonely with no one answering him, but he made me feel hopeful. Signs of spring are popping up and this long winter will soon be behind us.
I haven’t been doing a lot of sewing the past few months, but I’m on the schedule for my do.good.stitches charity quilting group to plan the quilts for April and May. So, this week, I thought I should probably get working on some plans! Naturally, I started with the last quilt that I organized, way back in October! At some point, I had pieced all the blocks together to get a top, but it needed a back. I had a few extra blocks that I decided to try to incorporate into the back, which meant that I needed to piece the back. It took awhile, and lots of pieces, but I did manage to get it done and sandwiched with some batting.
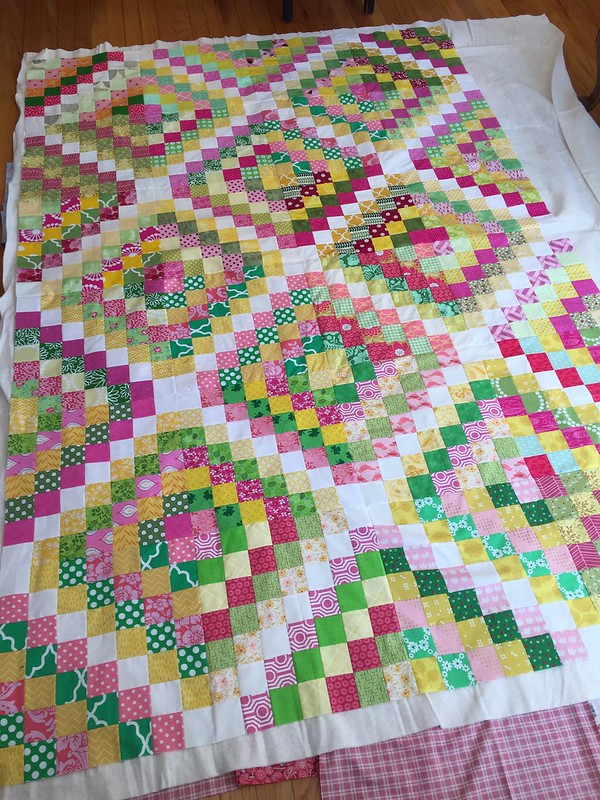
I am very pleased with the front. As for the back…well, I’m not so happy with that. I think the quilt blocks kind of get lost in all the different fabrics I used, but I’m going to leave it alone.

I didn’t have time to quilt it this week, but I hope to get to it in April sometime. It would be good to finish because I’ve got two more charity quilts that will be coming in for me to assemble in the next couple of months. I really needed to get those planned first.
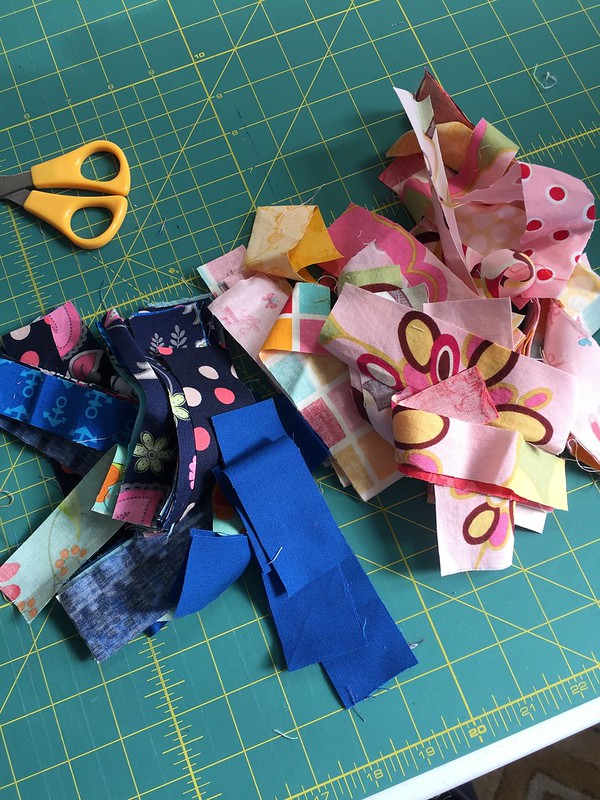
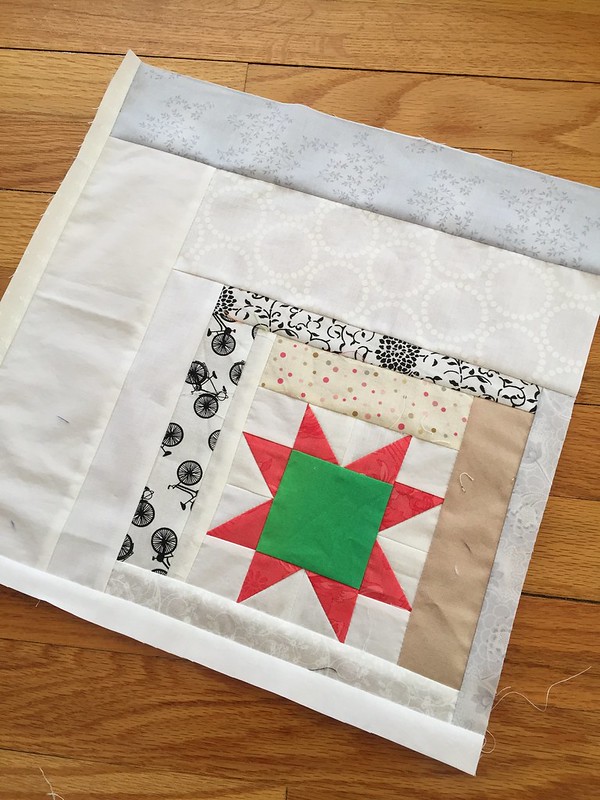
The first block I planned was inspired by the book, No Scrap Left Behind by Amanda Jean Nyberg of the blog CrazyMomQuilts. In the book, she makes a scrappy rail fence quilt that I thought would be a great way to use up some of those strip scraps that everyone has in their scrap bins. I pulled out a bunch and cut up strips that were 5 inches long and anywhere from 1 to 1.5 inches wide. As it turns out, most of them were blue or pink, so I decided to go with that for my color scheme.
Once sewn randomly together, I trimmed them down to 4.5 inches by 12.5 inches long. Then, I paired two of them with a white print of the same size to get this.
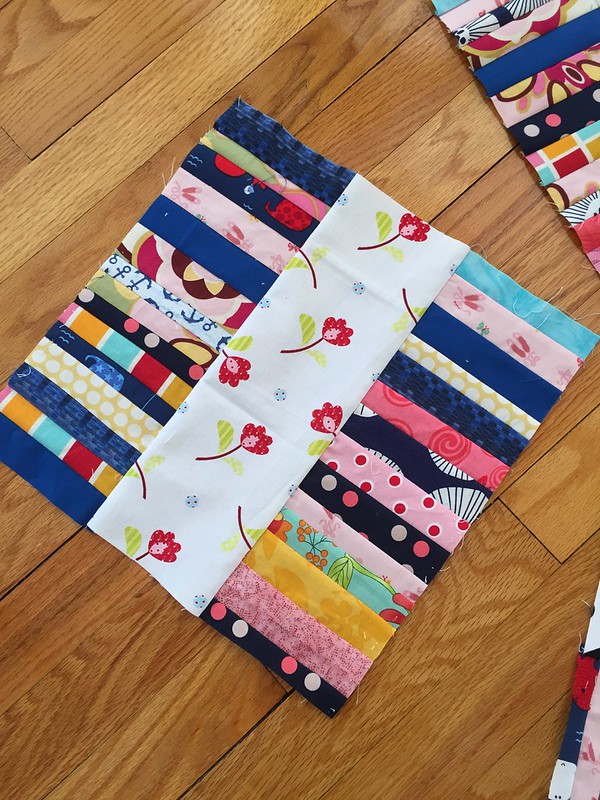
For my quilt group, I am asking for three of these 12.5 square blocks.

For my next quilt block, I really wanted to used up some scrap half square triangles that I have been collecting for awhile. Whenever I have a block that calls for sewing two squares together and then trimming them, I always sew another line a half inch from the original line.

Then, after trimming, I get a lot of these little half square triangles.

This is just a small sampling. I actually have a bin half full of them. Many are small, like this, made from sewing 2.5 inch squares. Some are larger, though. I picked out some that I had in sets of 8 and decided to sew up some sawtooth stars. For the center, I also pulled from my scrap bin.
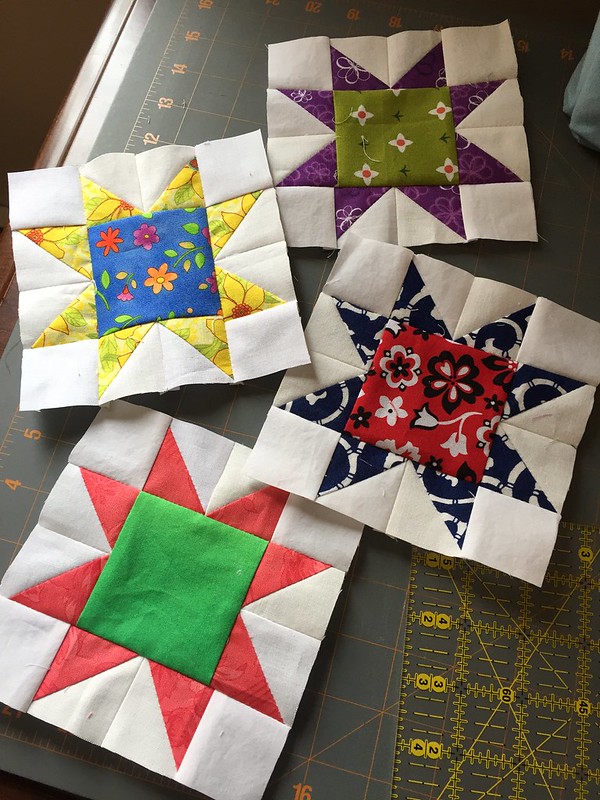
These little stars measure 5.5 inches, finished. I have long been inspired by Lynn Carson Harris, who also wrote an incredible quilt book about using scraps called Every Last Piece. Her Stardust quilt has always captivated me. For my second quilt block, I thought we could do something similar, but on a different scale and more improv-like. I had been looking for ways to use up some low volume scraps, and I thought it would be fun to combine those scraps log cabin style with these scrappy sawtooth stars.

I just started pulling out strips of those low volume scraps and started sewing without much of a plan, not really bothering if the strip was too long or if it was a true rectangle. It helps to iron and trim after sewing on each strip. This resulted in some slantiness, but I decided that I liked that. Halfway through, I also decided they would probably be more visually interesting if the stars were offset from the center.
I trimmed these blocks to be 14.5 inches square. I found from my Trip Around the Garden quilt that 24 of those sized blocks make a nice twin size quilt.
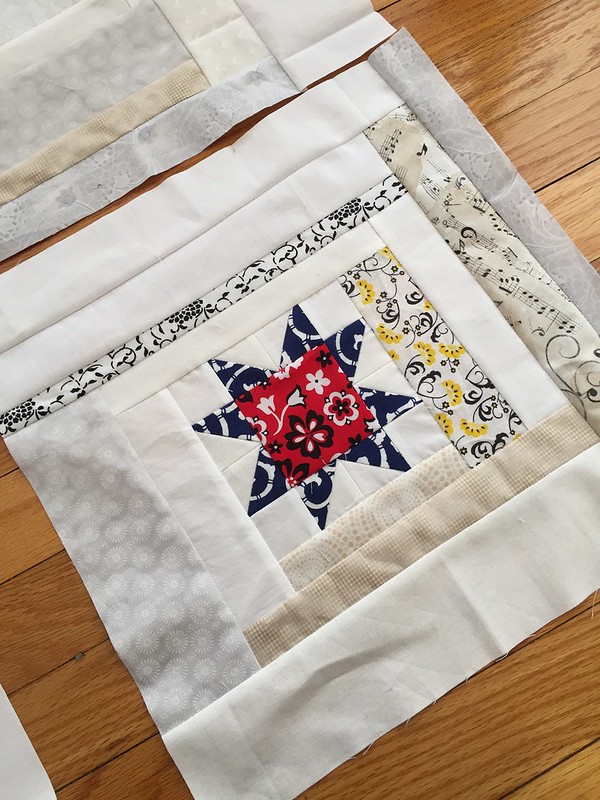
I’m asking everyone in my group to make at least two. The stars can be any size, as long as it is not bigger than 6 inches. I want there to be a lot of negative space between the stars. I kinda went a little crazy and made four because they were just that much fun. With the number of half square triangles in my bin, I could make a lot more, but I ran out of low volume scraps.
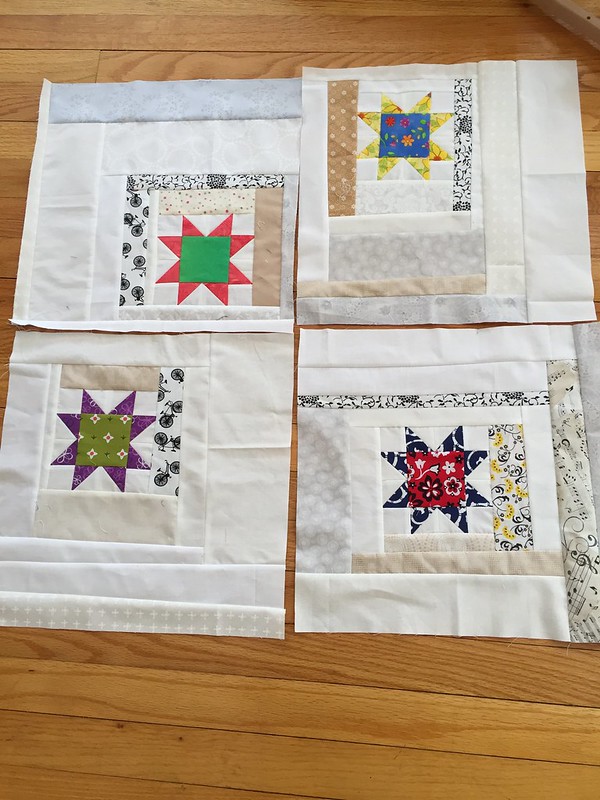
Well, I hope everyone in my group enjoys making these blocks. I can’t wait to see all the blocks I get and how they look together.
Have a blessed Easter, everyone!
Still No Sign
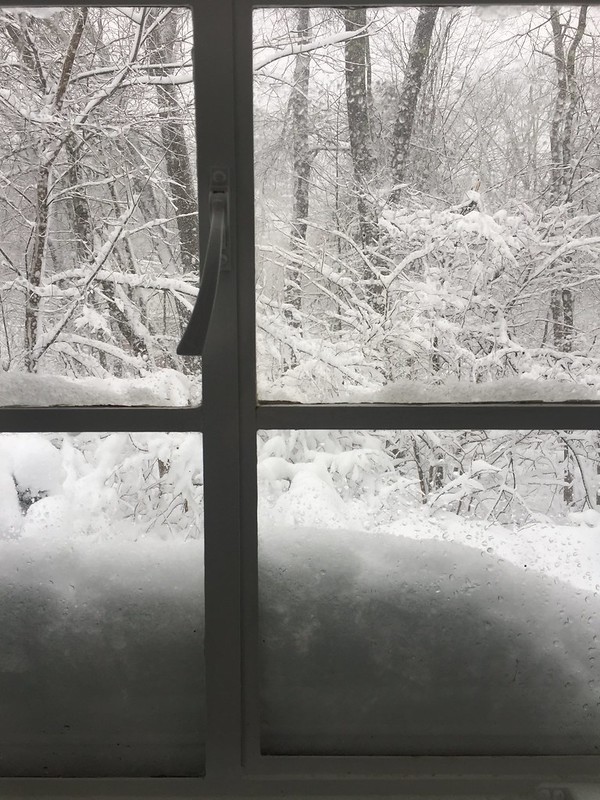
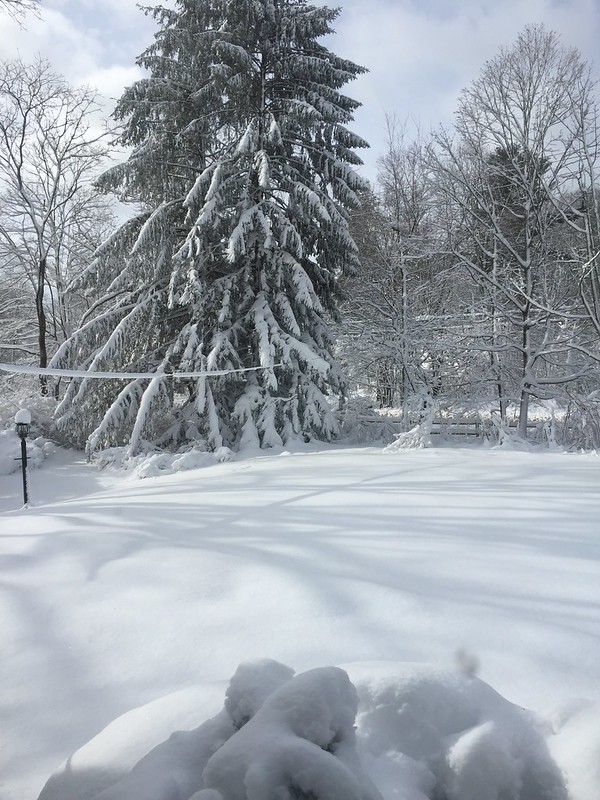
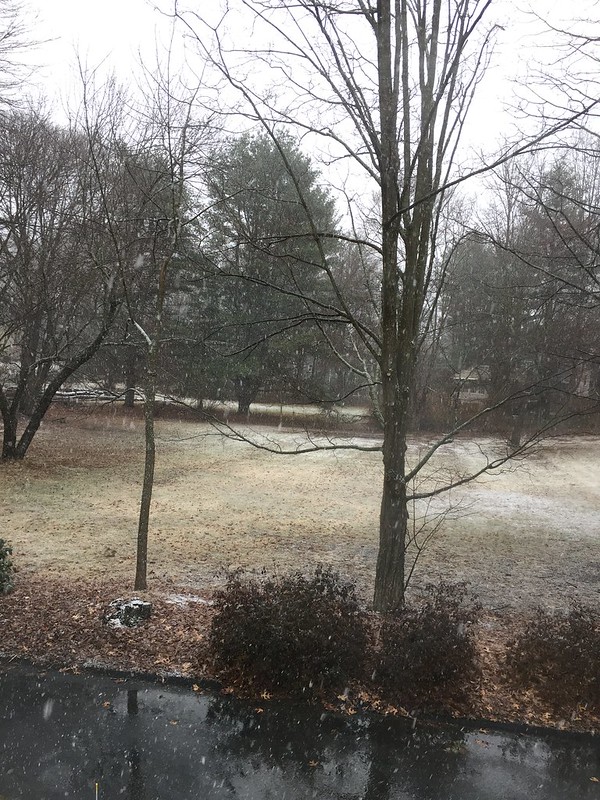
This post could also be titled, “Be Careful What You wish For”. Last week, I was complaining about our lack of snow. That night, as predicted, all that rain turned to snow and we woke up with a view that looked like this.
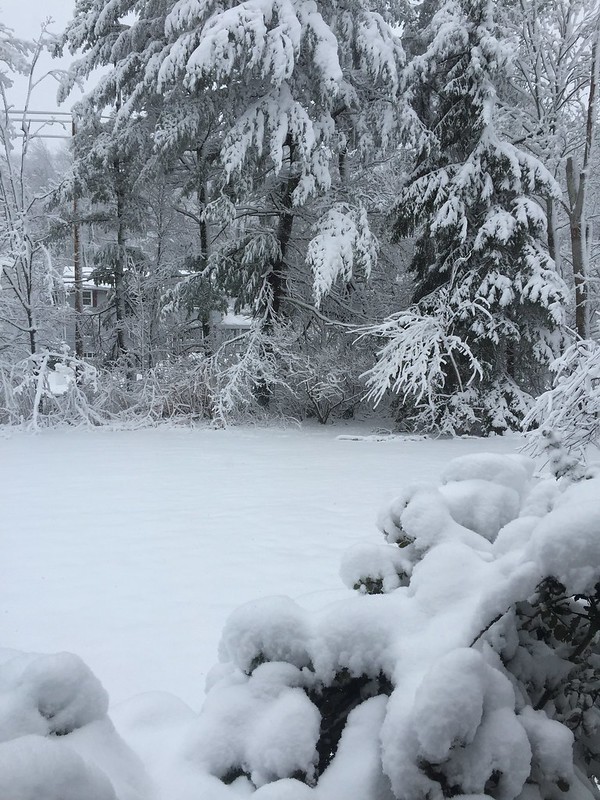
Unfortunately, we also woke up with no electricity. We were one of thousands, actually, without power in our town, not to mention the state in which we live. The storm took down countless trees and branches, so much so that it was difficult getting around because of road closures. Fortunately, we got the power back after about 20 hours and though we lost a few branches off some trees, we have no major damage.
While our power was out and we were “off the grid”, I did some weaving and managed to get to the end of my warp. I was a little disappointed because there was a lot of yarn leftover and I had hoped to use it all. However, the piece itself was not really lacking in length. I’m not really a huge fan of fringes, so I decided to try making a cowl out of this piece to see how it would look. I used my sewing machine to sew together the ends, capturing the edges in a seam so that I could cut off the fringe. Then, I convinced one of the boys to model it for me.

You can see how long it is here, but it wraps up nicely. If I made it longer, it might be able to wrap around three times, but two loose-ish wraps is all I can get out of this one.

It’s quite wide, so there are actually a lot of ways it can be worn. Here you can see it can be kind of like a hoodie.
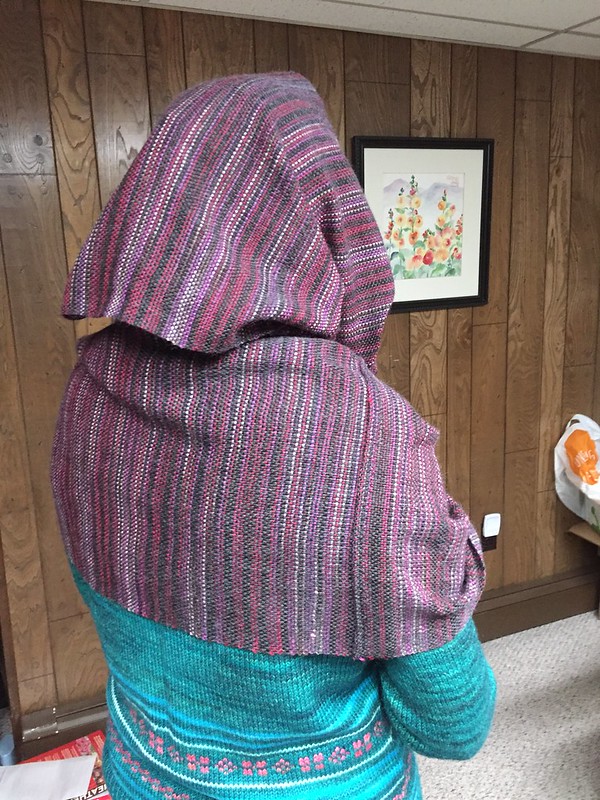
The husband said I looked like a character out of a Star Wars movie. I don’t know about that! Now, I would like to get started on another one, but I got a little distracted by a new knitting project.
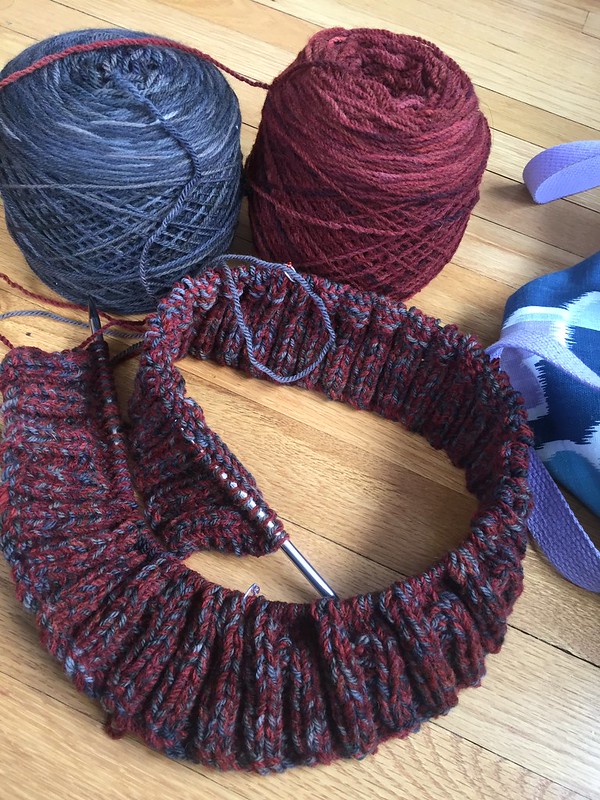
This is going to be a jacket sweater for the husband. Lately, he brought a sweater home from work that I made for him years ago. The sweater was in fine shape and just needed a wash, but I was unhappy with the way it looked. Over the years, I think my skills and style preferences have changed and I thought that sweater could use a replacement. After all, he wears it almost every day at the office, which means EVERYone he works with sees it. I know that really it’s fine and he likes it, but I no longer like it, which means it needs to be replaced, right?
Anyway, every time I look for a sweater to knit for the husband, I find that there are very few out there that I really want to make. Plus, I was having some stash problems. I tend to buy yarn in sweater amounts suitable for me, and even though I always buy a little extra, that little extra is usually not enough for a men’s sweater. Then, taking some inspiration from my recently finished Carbeth, I thought to combine two yarns to make a chunkier weight, which would in turn require less total combined yardage for a sweater. Yay! And to solve to pattern problem, I’ve decided to make it up as I go along. I did a quick gauge swatch and just dove right in. I think I will call it the Skylar jacket since I started it the day before we were hit with winter storm Skylar.
This time, thankfully, we did not lose power, so I was able to knit comfortably, cook a yummy dinner, and bake some cookies.
All activities that make up a perfect snow day.

Spring is supposed to be just a week away, but that seems rather unlikely, doesn’t it? That’s ok by me, though, because this view is pretty nice.
And I have an excuse to keep working on my chunky sweaters.
Not Spring Yet
Today, we are supposed be getting a Nor’easter storm that they say will give us potentially 12-16 of snow. It’s been snowing all day, but nothing has stuck yet. It’s just melting as it hits the ground. So, I am having a hard time believing that we will actually get any accumulation, but this is probably because I lived in the South all my life where I was conditioned to never to believe forecasts of snow because they invariably were wrong. However, here in New England, I have to say, the snow forecasts have been quite accurate, at least for the time we have been living here. I heard this week on the radio forecast that this storm is supposed to be a ‘regular’ Nor’easter (as opposed to the bomb cyclone kind) and would come with just 4-8 inches of snow.
Anyway, as we sit here and watch the snow fall outside and wait for the storm to really arrive, I feel a little like that snow that falls on the ground and just melts. Sometimes, it seems that I work on things for a long time and nothing seems to happen. Or, I am busy all day for days, but don’t seem to be making any progress, but I know that’s not true. It’s just that progress is sometimes invisible.
Take for example my weaving project. At first glance, it looks pretty much the same as the last picture I showed you.

However, I am actually half finished. Or at least, I used half of my yarn. I may actually be closer to finishing than I want to be because I don’t think my warp threads are long enough. I work on this in the few minutes I have here and there throughout the day. It’s easy to stop and start and it moves along quickly as well. Just 12 minutes after the photo above was taken, I had woven about 6 inches and it looked like this. Then, I wound it up and it looked the same as above.

Life is a lot like this, I think. It’s work, work, work, everyday and nothing seems to change, but take a minute to step back and look at the big picture, and you realize, actually, quite a lot has changed. I spent some time this week looking for a new sweater project. I had the pattern and wanted to use yarn in my stash, but after spending a lot of time sifting through my yarn, I came to the realization that I did not have the right yarn and abandoned the idea. Was that a waste of time? I don’t know. Because of that failed project start, I went back to my happy stripey cardigan. Noro yarns are so fun to knit with because the color changes can be surprising, but somehow they all work together. In the skein, these had an autumnal/halloweeny feel to the colors, but knit up like this, I see it is more springlike than I thought.
And just because I could not start the sweater I wanted to, I decided to start another sweater that had the pattern AND yarn ready and waiting. Also, it’s a bulky weight sweater and I thought I better get it started while it’s still cold and so I Cast on the appropriately named Avalanche sweater by Heidi Kirmaier. So, usually no progress in one area, just means that progress is being made somewhere else.
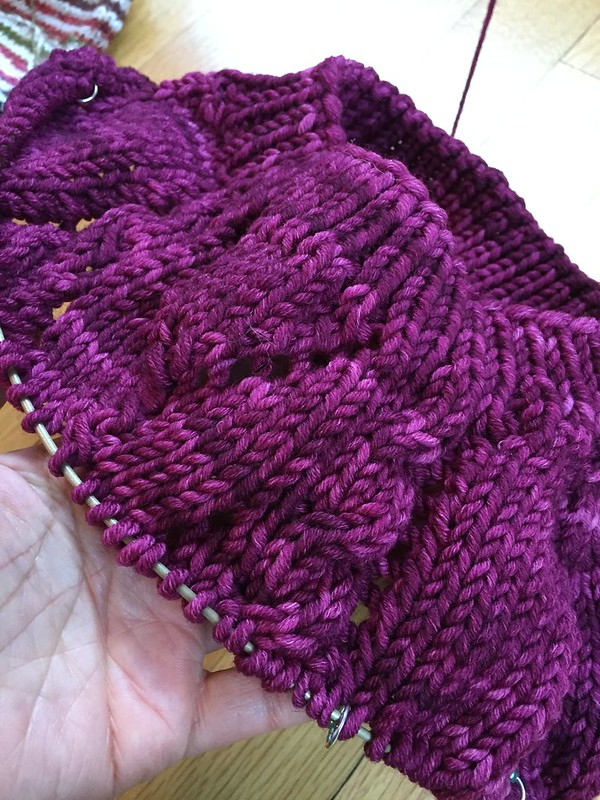
This one is not as fast as Carbeth, but I also haven’t spent much time on it. It’s all scrunched up on the needles right now, so it is hard to see, but there is some lace and a couple of cables, too. I think I’ll devote more time to it tonight since it feels more wintery today. It’s hard to believe we had a day last week that was almost 70 degrees. But, even though daylight savings is this week, and I heard that the meteorological first day of spring has already passed, it does not look like spring outside.
However, it does look like spring with my knitting.

I told you I would be knitting pink things next. Maybe spring will come faster if I knit with spring colors? But I do have some blue things on my mind too.

